Eyes Beyond The Ordinary

We are knee deep into May and June will arrive faster than we can count the days on the calendar.  With that, Keith and I will start shifting our focus to our annual pilgrimage to the Canadian Rockies to lead this year’s workshop.

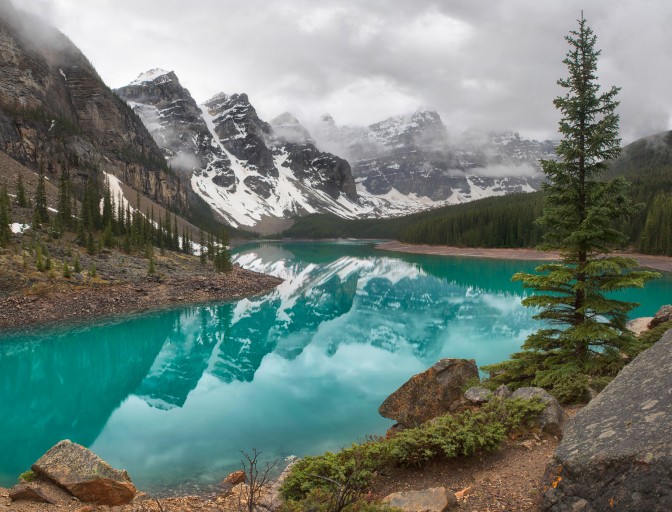
This image was captured at Lake Louise.  Lake Louise is a special spot for me.  My grandmother had one life-long dream and that was to experience and see the turquoise waters of Lake Louise with her own eyes.  In fact, she kept a postcard on her refrigerator of the beautiful lake for as long as I can remember.  She never made it there.   Whenever I step to the shore, I think of her.  It’s a special place that’s iconic to many people.

Sentiments aside, and photographically speaking, Lake Louise is a hard place to photograph.  The majority of times I’ve been there, the clouds lingering over the glaciers stick close to the ridge, and don’t allow the color and light to creep in.  Also, there is a boardwalk that stretches in front of the Chateau Lake Louise that most tourists capture images from.   While you can make the trek to Lake Agnes and the teahouse, few photographers venture there.  It’s a bit of a lung burner.

On this particular trip (last year), we had an exceptional sunrise for which I was abundantly thankful for.   However, I very much wanted a different composition from what you usually see coming from there.  I decided that I might be able to unleash some creativity if I released the glacier from needing to be in my point of view, and I embraced what everything else around me was saying.    That’s how this image was created.

Photography teaches me many life lessons.  Sometimes we have to let go of something we are expecting, or familiar to us to receive something fresh, new, and unexpected.   This is true as well of your creativity.

I’d love to hear from you.   Do you have an image you can share or a story that reflects this lesson in your own life?


Photoshop Update: Select Subject

Select Subject is powered by Adobe Sensei and lets you get started with your selections faster than ever before. Select Subject automatically selects the prominent subjects in the image with one click. You can then refine the selection using other selection tools.

It’s available in all the places you start selections:

  • Select > Subject.+ 
  • Select the Subject button in the Quick Selection tool and Magic Wand options bar.+ 
  • Select the Subject button in the Select & Mask workspace options bar while using the Quick Selection tool.+ 

The Select Subject command lets you select the most prominent subject in an image in a single click. Powered by advanced machine learning technology, Select Subject is trained to identify a variety of objects in an image—people, animals, vehicles, toys, and more.

Access Select Subject in one of the following ways in Photoshop:

  • While editing an image, choose Select > Subject.
  • While using the Quick Selection or Magic Wand tools, click Select Subject in the options bar.
  • While using the Quick Selection tool in the Select & Mask workspace, click Select Subject in the options bar.

Select Subject automatically selects the prominent subjects in the image. You can then refine the selection using other selection tools. For example, in the illustration above, use the Subtract From Selection option with another selection tool to remove the part of the sidewalk included in the automatic selection.

For more information on refining selections, see Adjust pixel selections.


*Article Credit:  Jerry Harris & Adobe Blog

How Do I Make My Pictures Sharper?

Oh the frustration!  You just returned from an amazing adventure where you invested time, money and sleep to land the perfect shot, only to come home and realize your picture isn’t as sharp as what it could be.  Although it won’t make you feel better, this has happened to all of us.

Going back to the basics, we are going to cover some things Keith and I do in the field to get the sharpest images possible.


Sturdy Tripod

This can’t be stated enough.  A flimsy tripod that is difficult to set up is the perfect recipe for field frustration.  I (Tiffany) started my photographic journey with a Manfrotto tripod and a pistol grip ball head.   When I moved to Fujifilm and a mirrorless system, I didn’t have the heavy weight of a Nikon and so I was able to move down in the weight of my tripod and still achieve a strong stabilization.  Currently I now use the Slik Lite Series.

Keith on the other hand is shooting with a Nikon D810 and with the weight of that system he needs a tripod that can really stand strong.  He has an RRS tripod.

Over our time photographing, and much of that time being spent in harsh conditions with ocean water tearing up our tripod, we can’t stress this enough:  spend a little more money and buy once.   A tripod isn’t the place I would try to cut corners.  You’ll only be frustrated when it breaks down on you and you have to buy another one.


Cable Release

 We have a joke in our family about Keith’s ability to kill a cable release.  We almost need to just have them regularly delievered to our home.  He thinks it’s the manufactuor, and I think it’s his passion in the field that puts the durability to the test.  Regardless,  having a cable release will allow you to not touch your camera at the point of capture so that you can get the sharpest image possible.

As a Fujifilm user, I’ll either use my 2 second timer, or I’ve downloaded their app and I can control the shutter with that.


Remove The Strap

 At least one point or another of nearly all of our tours, you’ll find Keith and I wrapping the camera strap of a guest around the tripod.  We do this so that the wind can’t capture the material and cause shake.


Check Your Settings

Having a system in the field is paramount to being sure you’re not missing anything.  Checking your ISO, aperture, exposure and focus should be a system you mentally walk through before you start your shoot.  When an extraordinary scene takes your breath away and the light is leaving, you may be inclined to just start shooting, but this could be a mistake that can cost you the experience.


Choosing The Right Aperture

 While in the field with beginners who are just starting to learn about aperture I tell them this: “Big scene, bigger number.  Small scene, smaller number”.  This is a deeply oversimplified statement, but it helps beginners to remember that a smaller aperture (larger number) will give them maximum sharpness.  All circumstances vary, but Keith and I tend to float somewhere between f/8 and f/11 for our landscapes.  When in doubt, go to F/11.

Today we’ve taken a high pass over some of the things we do in the field to get the sharpest images possible.  For more info, stay tuned to upcoming blog posts or come out and go on an adventure with us!  We’d love to have you!